The Tin can itself as it applies to detection:
The Destroyer (DD) or Destroyer Escort (DE), can only do one of two things. It can listen (passive), and it can ping (active). What it can't do, is both at once. Hence I feel its a safe assumption to say, if a Tin can is pinging, hes not listening, and if hes not pinging he's listening. Two important note's here to eliminate confusion:
A.) with multiple escorts on you, there is ALWAYS somebody listening.
B.) The AI tends to key in on whichever sensor is recieving the biggest signiture there is to pick up on. While it can only use passive or active at a singular moment in time, it can switch between the very quickly.
Active sonar, or being pinged:
- something the AI wont do unless you allow it!
There are several types of sonar, and they all differ in geometric statistcs. Each one becoming a bit more effective then the previous version. From all ive been able to tell, the AI will not ping you unless:
A.) You are in his active sonar cone.
b.) You are presenting him a favorable aspect
c.) You are doing both A, and B for X number of seconds.
An illustration of this in action is a typical convoy attack where your sitting ahead of the convoy at a dead stop, and yet that lead escort still manages to ping you. In that scenario you did A, B, and C.
To understand the sonar cone you have understand three primary aspects as it pertains to its size and shape.
- They have a downward angle. The more downward angle they have, the deeper they can detect things. Naturally late war sonar has more downard angle then early war sonar.
- They have a maximum range.
- They have a maximum width or radius.
Early war Sonar:
- So easy to avoid, it feels like cheating
So for an illustration, heres a picture of an early war sonar in action:
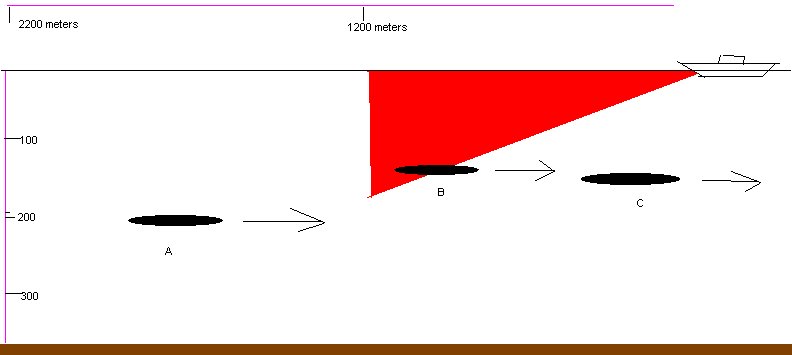
Note that its limited in range, and doesnt have much of a downward angle. Hence it doesnt go very deep.
Sub A:
Is not only out of the sonars range, but he's below the sonars cone, floating saftely along at around 200 meters or maybe a touch deeper. (drawings are not to scale). Active sonar for him is a complete non factor. He will never hear not so much as a single ping out of the escort at all. Even if he falls within the sonars range, because he's below it, it will still not hear any pinging at all.
Sub B:
This fellow is probably around 170 meters or so, or even shallower. Note that if he went deeper, he'd be under the sonars cone, joining his comrade A in the saftey of the depths. Or likewise he could simply move towards the escort as it's coming at him, hence getting under the cone at a shallower depth then sub A.
Sub C:
At his depth he would be within the destroyers active sonar cone, but due to the angle of the beam, hes in effect, in the destroyers blind spot. This is standard to any sonar in any year of the war. A destroyer looses active sonar contact when hes about upon you. At this poin't he'll try and either regain contact on passive sonar, or launch an attack at your last known position - which is what they typically will do.
The obvious solution early war is to dive to around 230 meters or so and stay quiet as a mouse. Pretty simple no?
Late war sonar:
- Now we have the payoff
Now lets spice things up a little and look at a later war active sonar in relation to the previous example:
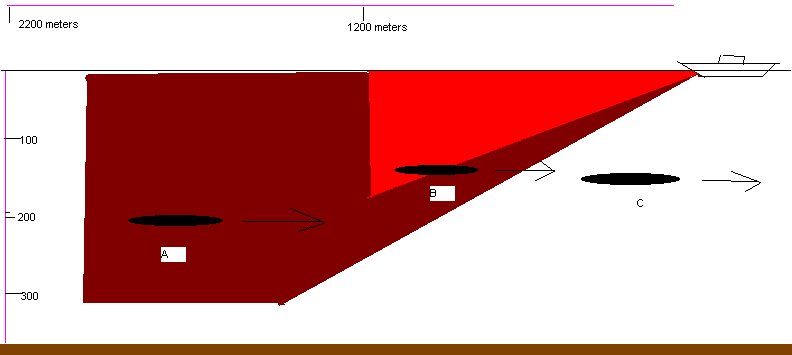
At this stage in the war, life has most certainly gotten complicated for you. In red you'll see the old early war sonar. The darker red represents the late war sonar.
Sub A:
Our smart fellow from the early war will now find that he is not only being detected, but is being detected from a fair distance. However, if he goes DEEPER, he'll find that as the tin can approaches him, he'll stopped being pinged much sooner then the other subs.
Sub B:
This fellow, didnt quite change his tactics from earlier in the war and is finding himself being pinged much sooner, for much longer.
Sub C:
Although hes in the tin cans blindspot, because he wasnt at the absolute maximum depth hes boat can obtain, the tin can's been pinging him for a good long time and probably has a pretty damn good fix on him.
Again, the obvious answer to late war sonar is,
"yes, Deeper still!"
Aspect
- Presenting yourself as a smaller target
The last item i should cover on active sonar his the width of the beam and aspect. Simply put:

Aspect is simply how much of your boat your presenting to the AI to get a ping off of. Or in other words, your profile. Obviously pointing your bow or stern at an escort is give the escort less of your submarine to get an active sonar ping. Giving your broadsides to an escort is basically saying, "Please sir, can i have another?"
Active sonar out of the way, it's time to hear that pin drop.
Passive sonar
- pretending to be a big hole in the water
What could i possibly tell you about passive sonar, your probably wondering. Go to 1kt and go to silent running right? Well.... yeah, but theres a bit more to it then that.
The AI's ability to hear you depends on a few things:
A.) The state of the sea.
If the sea is calm, sonar conditions are greatly improved. If the sea is rough, sonar conditions are craptastic to say the least, and for you, this is good news.
b.) Engine RPMS.
It's not your speed per say that the AI qeues in on. Its your engines RPMs. When setting your speed, use the interior free cam and take a close look at your engines RPMS. 100 RPMs is usually the maximum i would go in a silent running scenario.
c.) Your position in relation to the escort. Looking back up at the picture of the aspect, you'll see a big semicircle around the destroyer. The area behind it, is its deafspot, or its baffeles. Its also deaf to anything DIRECTLY under it, at or around a radius of 10 meters. Depth charge attacks DO NOT mask your noise. Only when an escort is directly above you, or if you are directly behind an escort are you completely safe to use as many RPM's in your motors as your heart desires.
Shallow water and wind:
- Taking calculated risks, or why descretion is the better part of valor.
Remember, you have the element of surpise, and dictate the terms of when and where an attack will happen. Before executing an attack the first two things that should pop into your mind before you even begin open the outer doors is, how much water do i have under my keel and how rough is the sea?
A sad truth here is that shallow water can kill you no matter what year of the war it is, and no matter what AI settings the mod your using has. Even STOCK AI, is deadly in shallow water. Avoid it if possible.
Calm seas are also a concern. If you execute an attack on a well escorted target in calm seas in shallow water, you pretty much took an unnecceessary risk.
Conversly, an attack in shallow waters in rough sea's could be an acceptable risk. It is up to you, the commander of that submarine to make that decision. Heres a quote for you:
"He was prudent. If there was a danger that threatned the crew or the boat he would go out of the way to avoid it without forgetting why he was there in the first place. Yet he was not over-cautious. We sank ships with Mohle"
CONTACT!!!
- Or, why you need to disappear for a little while.
In terms of Escort evasion, you need to be able to avoid letting the AI get a passive or active sonar contact on you for an X number of mins. In Trigger Maru that time is 30 mins game time. It is important to note that during this time the AI will be doing everything it can to reaquire contact!
But thats not your only concern. Anytime an enemy unit makes contact with you. Either visually, on radar, sonar, what have you, it broadcasts your presence to any other unit in the area. This includes planes.
This means that any enemy war unit that is within 30 mins distance to your location will come looking for you. An example of this is say you have just attacked a convoy, 3 out of 4 escots have given up and rejoined the convoy, but that persistant 4th escort is still looking for you, and gets a contact. What you'll see then is the other 3 escorts immediatly start steaming to your location, but if your 35 mins away, they'll turn around and go back to the convoy, even if only 5 mins distance away - unless that 4th escort makes another contact.
So what the hell do i do if i have multiple escorts camping out up top?
That i beileve is completly situational, depending on year of war, number of escorts, and the state of the sea. More often then not, you may just have to wait them out, staying as deep and as silent as possible. I can say this though, with the knowledge of how AI detection works, ive been sunk by depth charges once.. maybe twice, in well over a year playing SH3. I worry about planes more then i worry about depth charges, hedgehogs however are top on my list of things i dont like.
One last thing:
Thermal layers
- or why using SH3 commander can save your ass if all else fails.
One thing i nearly forgot to mention was thermal layers. In short, its a temperature gradiant in the water that active sonar can't get by.
Looking at active late war sonar again:
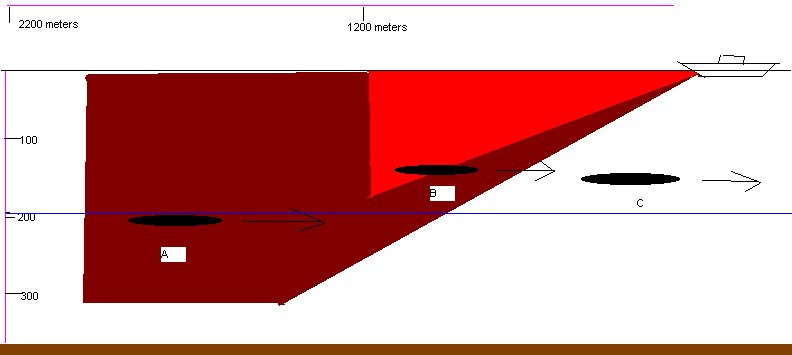
By default, the AI sensors in SH3 cannot detect anything beyond 300 meters. Infact, depth charges will not decend beyond that point as well. They just POOF, and vanish into thin air without detionation. So if your modding your boat to dive deeper then 300 meters, you sort of cheating your ass off. However, put in the context of a thermal layer above 300 meters where depth charges can still explode, you have a historical way to make things a bit easier for you.
Although i personally don't use this option, one nice thing about SH3 commander is it can randomize the maximum depth the AI sensors can go. Default is 300 meters. But since its randomzied, you don't know WHERE exactly this simulated thermal layer will be, you only will know that it exists. Every time you launch SH3 via Sh3 comamnder it will randomize a new maximum depth for the AI's sensors. So, if you allow it, it will constanatly change, thereby keeping you guessing.
The blue line in the above picture could be an example of SH3 commander changing the max depth of Sensors. Where as now Sub A is again below the active sonar cone, and safe from being pinged.
This has been long reading im sure, and longer in typing. I hope it helps.